Ahad, 22 Januari 2012

How To Make Twitter Account


Click SIGN UP FOR TWITTER


Then Fill the required information. Then click
CREATE MY ACCOUNT


 Let's started :)


Just Follow who you want to follow :)


Don't forget to confirm your email :)


That's all :) from me.
Thanks for reading :)

Rabu, 9 Mac 2011

Ipad :DD Easy & Modern

Ipad?Right or Left
Answer : Right
Left : Iphone


Thinner, lighter, and
full of great ideas.


Once you pick up iPad 2, it’ll be hard to put down.
That’s the idea behind the all-new design.
It’s 33 percent thinner and up to 15 percent lighter, so it feels even more comfortable in your hands.
2 And it makes surfing the web, checking email, watching movies, and reading books so natural, you might forget there’s incredible technology under your fingers.

Easy To Carry Anywhere :)

Rabu, 23 Februari 2011

How To Create Shoutmix & Paste Shoutmix Codes At Blogger

1.Go to www.shoutmix.com


2.Click Create Shoutbox
3.Complete This Informations
-SHOUTBOX INFORMATION
-CONTACT INFORMATION
4.Click Continue 
5.You Can Change Colour & Size At Settings
6.Copy your codes 
7.Go to Blogger dashboard
8.Click Design
9.Click Add Gadget & HTML/Java Script
10.Paste Shoutmix Codes At 
11.Click Save
12.Finish :DD


Isnin, 21 Februari 2011

how to change blogger template

1.Get your own layout code

2.Go to Blogger


3.Sign in

4.Click Design


5.Paste your layout code at EDIT HTML

6.Finish

How to Delete a Blog Post on a Blogger Archive Page


Instructions

  1. Go to blogger.com
  2. Sign in.

  3. Click "View Blog."
  4. Click "Customize."
  5. Click on the "Posting" tab.
  6. Under the "Posting" tab, click on "Edit Posts."
  7. Search for the older (archived) posts you wish to delete and click on "Delete."


Selasa, 9 Februari 2010

how to insert music to microsoft power point

Step 1. Download your music in MP3 or WAV format.
The best format to download songs in is in the MP3 format. This has the smallest file size. However there is one big problem with mp3 files - you can only link but not embed mp3 files into PowerPoint.


Step 2. Insert the music in your PowerPoint presentation.
From the main menu Insert > Movies and Sounds > Sound from file
Then from the Files of Type drop down box select mp3 format.
You will then get a message about how you want the music to start
Step3 - Setting the music to play across multiple slides.
Select your music file then Right click (not the usual left click) and select Custom Animation. You can do this by selecting Slide Show.  Custom Animation
How you do this depends upon which version of PowerPoint you are using.
For older versions of PowerPoint
Then select Multimedia Settings afterwards and make sure that you have selected While Playing >Continue Slide show You will then need to set the Stop Playing button and enter in the Stop Playing > After number slides the number of slides that you would like the music to play for.

pie chart and bar chart

Slide Number three on our presentation is another chart. This time, instead of a bar chart, we have a simple Pie Chart. This is what your chart will look like when it's finished:
The Finished Pie Chart
This Pie Chart shows information about telephone calls. It's meant to show how well (or not) each shift is doing. The morning shift spend 8 minutes per call talking to customers, the afternoon shift 6 minutes, and the evening shift 12 minutes. Again, this is a simple chart that would tell an audience fairly quickly what they needed to know.
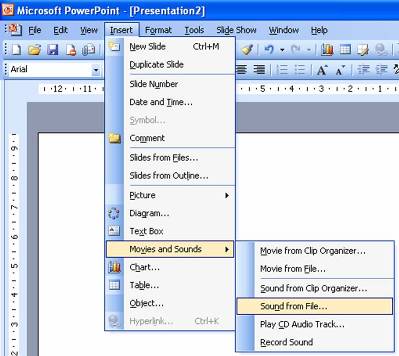
To add the Pie Chart to your presentation, insert a new slide as before. First, click Insert > New Slide. Select the Chart template, either from the dialogue box for PowerPoint 2000, or the Task Pane in PowerPoint2003.
You'll see the template appear on the main PowerPoint stage:
PowerPoint Title and Chart template
Click inside the Title area at the top and add the following title:
Average Call Handling Time
(in minutes)
The font used is Arial, and the first line is 44 points in size, while the second line is 20.
When you've added the Title for slide 3, "Double click to add chart", just like it says. You should see the same default slide appear as for our first slide. The Datasheet will appear, as well. Delete Rows 2 and 3, just like you did for the first chart. Then enter the following information in the Datasheet:
Data for the Pie Chart
When you're finished, your Datasheet should look like this:
PowerPoint DataSheet
And your chart will look like this on the PowerPoint main stage:
Default Chart
The default is a 3D Bar chart. What we want is a Pie chart. To turn your Bar chart into a Pie chart, right click anywhere on the chart itself. (Right clicking on any of the bars should do it. If you can see white squares or circles surrounding your chart instead of black squares, double click the chart.)
When you right click, you should see this context menu:
Select Chart Type from the menu
Select Chart Type from the menu, and the following dialogue box will appear:
The Chart Type dialogue box
The dialogue box shows all the chart types running down the left hand side. When you click a Chart Type, you'll see the various options for that chart. Click on Pie, and your dialogue box should change to this:
Select the Exploded Pie Chart
As you can see, there are 6 Pie charts available. Click the fourth one, the one highlighted in black in the image above. This is call an Exploded Pie chart. An exploded pie chart is one where the segments are separated. Click OK and your chart will look like this:
Your Pie Chart should  look like this
It doesn't look too bad as it is. But we can format it a little. The first thing we can do is to change the colours of the segments, which we'll do in the next lesson.